第八步,运行
现在我们将在jbuilder4内运行容器来执行这个bean,选运行visibroker smart agent:
tools | visibroker smart agent
设置运行容器的参数
run | configurations…
编辑<default>的设置.
选中 ejb 页.
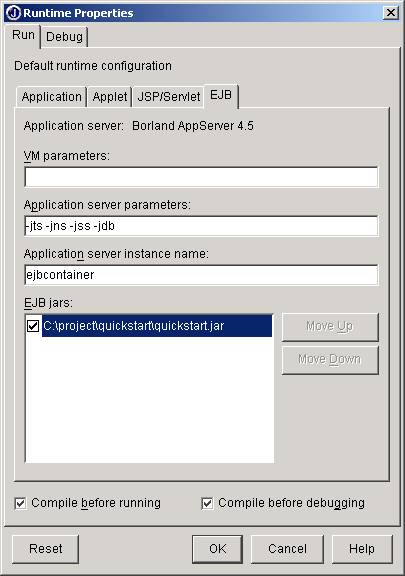
点 ok, ok.
运行这个container 等待它初始化
右击client.java,选中run ,运行客户端。
在消息窗口可以看到这样的输出信息。
c:/jbuilder40/jdk1.3/bin/javaw ?cclass… using teller no: 1
.
如何调试
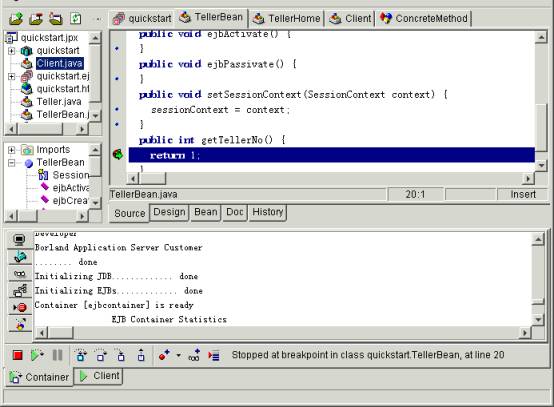
1. 设定断点
在tellerbean中找到这一行
return 1;
右击这一行,选择toggle breakpoint(或按快捷键f5),这一行将会加亮成红色。
2. 装入容器
点

,如果在消息框内出现
borland application server customer
........ done
initializing jdb............. done
initializing ejbs............. done
container [ejbcontainer] is ready
ejb container statistics
========================
time fri jun 08 21:51:22 cst 2001
memory (used) 1304 kb (max 1304 kb)
memory (total) 2292 kb (max 2292 kb)
memory (free) 43.0%
------------------------
home tellerhome
total in memory 0
total in use 0
========================
则可证明container运行成功。
3. 运行客户端
用右键点击client.java,选中run,在调用远程方法时,将跟踪到ejb的内部,想想这个,真是爽呀!jbuilder4开发ejb,真的历害。
3. jsp
开发环境的配置
jbuilder提供了一个jsp开发的完整系统,包括一个用来创建jsp文件的jsp向导,及对jsp标记的codeinsight(加亮显示,自动完成)技术,集成的tomcat引擎(支java servlet 2.2 及jsp 1.1 ),可以使用户在集成环境下调试jsp代码。
系统无需特别的设置,便可以用于开发jsp。
实例操作步骤
1. 生成一个jsp工程
选择 file|close project关闭所有的打开的工程。
选择 file|new。
选中object gallery的new页中的 javaserver page. 这时将出现工程向导。
把project name改成samplejsp.。
单击finish按钮接受其缺省的配置。
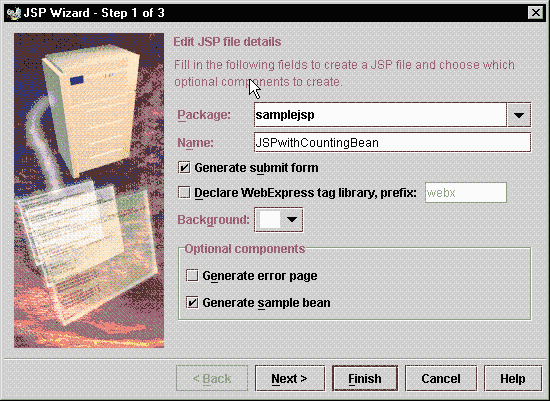
这时工程就创建了,系统将弹出jsp向导。
在jsp向导的第一步中输入jspwithcountingbean,单击finish。
jsp创建成功。
工程的主类是生成的jsp文件,下面两个文件将加入工程中:
jspwithcountingbean.jsp ?c 一个包含jsp标记的html文件。 jspwithcountingbeanbean.java ?c 一个jsp文件调用的bean。
双击在工程窗格中的jspwithcountingbeanbean.java,在源程序中增加以下黑体部分代码。
package samplejsp;
public class jspwithcountingbeanbean {
/**initialize variable here*/
private int mycount=0;
private string sample = "start value";
/**access sample property*/
public string getsample() {
return sample;
}
/**access sample property*/
public void setsample(string newvalue) {
if (newvalue!=null) {
sample = newvalue;
}
}
/**new method for counting number of hits*/
public int count() {
return ++mycount;
}
}
双击在工程窗格中的jspwithcountingbean.jsp,在代吗中增加以下黑体部分代码。
<html>
<head>
<jsp:usebean id="jspwithcountingbeanid" scope="session"
class="samplejsp.jspwithcountingbeanbean" />
<jsp:setproperty name="jspwithcountingbeanid" property="*" />
<title>
jspwithcountingbean
</title>
</head>
<body>
<h1>
jbuilder generated jsp
</h1>
<form method="post">
enter new value: <input name="sample">
<input type="submit" name="submit" value="submit">
<input type="reset" value="reset">
value of bean property is: <jsp:getproperty name="jspwithcountingbeanid"
property="sample" />
<p>this page has been visited :<%= jspwithcountingbeanid.count() %> times.
</form>
</body>
</html>
2. 运行jsp
要运行jsp
右击jsp文件
选择 web run.
如果没有错误,tomcat将启动,在内容面板中将出现web view与web view source 页,web view相当于一个浏览器,返回jsp运行的结果。如果运行成功将可以看到以下内容:
jsp in web view
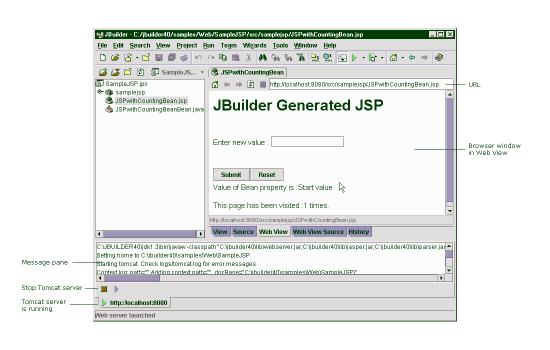
可以点击web view 页中的submit按钮,可以看到page counter在增加。tomcat所有的输出信息/日志都显示在message窗格中。
3. 调试jsp
要调试jsp,先设置一个断点,具体步骤如下:
在jspwithcountingbean.js中的源文件窗格中,找到下面这一行:
<p>this page has been visited :<%= jspwithcountingbeanid.count() %> times.
.
点右键,在弹出菜单中选择toggle breakpoint。
右击jsp文件,选择web debug即可调试。
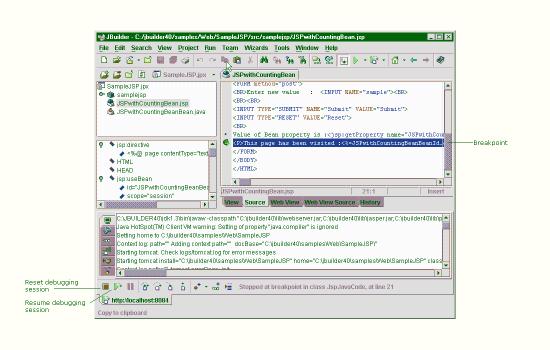
如何调试
如上节所提,上图就是调试的界面。
4. servlet
开发环境的配置
无需特别配置,jbuilder4已经为我们配好了开发环境。
例操作步骤
1. 生成一个servlet
在jbuilder内创建一个新工程
选择 file|close 关闭其他工程
选择 file|new, 在object gallery.双击servlet图标
这时将出现工程向导,将目录、工程名设为sampleservlet。
点finish.
这时出现servlet向导
创建一个新的servlet:
类名设为firstservlet。
选中dopost()方法(通常doget()方法已被缺省选中了 )。
点next.
让shtml文件保持缺省设置,点next。
点add按钮加入一个servlet parameter,这样将在shtml文件内生成一些这些参数的引用代码。请对应下表将参数设为下表的值:

点finish,这时工程内将有一个firstservlet.java文件和一个firstservlet.shtml 文件。servlet库也将自动载入工程的library。
在firstservlet.java内加入以下代码,新再入的代码也被标为黑体。
package firstservlet;
import javax.servlet.*;
import javax.servlet.http.*;
import java.io.*;
import java.util.*;
public class firstservlet extends httpservlet {
private static final string content_type = "text/html";
/**initialize global variables*/
int connections;
public void init(servletconfig config) throws servletexception {
super.init(config);
connections=0;
/**process the http get request*/
public void doget(httpservletrequest request, httpservletresponse
response) throws servletexception, ioexception {
response.setcontenttype(content_type);
printwriter out = response.getwriter();
out.println("<font color=/"green/">");
out.println("<p>the servlet has received a get. this is
the reply.</p>");
out.println("</font>");
}
/**process the http post request*/
public void dopost(httpservletrequest request, httpservletresponse
response) throws servletexception, ioexception {
file://name of user
string username = "hey you";
try {
username = request.getparameter("username");
}
catch(exception e) {
e.printstacktrace();
}
response.setcontenttype(content_type);
printwriter out = response.getwriter();
out.println("<html>");
out.println("<head><title>firstservlet
</title></head>");
out.println("<body>");
out.println("<p>the servlet has received a post.
this is the reply.</p>");
out.println("<p>thanks for visiting, ");
out.println(request.getparameter("username"));
out.println("<p>");
out.println("hello world - my first java servlets program!");
out.println("<p>you are visitor number ");
connections++;
out.println(integer.tostring(connections));
out.println("</body></html>");
}
}
2. 编译
要编译serlet,先到设置运


 闽公网安备 35060202000074号